Service Manager
This is the latest version of the help for Ivanti Service Manager 2018. If you cannot find some of the features described in the help, you may be using an older version of the application. To upgrade the application, click here.To view the help for the latest version of Service Manager, click here
Creating a Report Using Microsoft Business Intelligence Development Studio (BIDS)
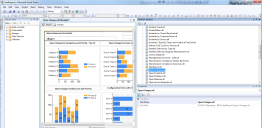
•About Using Microsoft Business Intelligence Development Studio
•Creating a New Report with BIDS
•Editing an Existing Report with BIDS
•About the SSRSReportExtension.dll File
In addition to using Microsoft Business Intelligence Development Studio (BIDS) to create reports, you can also use the Microsoft SQL Server Reporting Service (SSRS) report builder. The Microsoft SSRS report builder is integrated with Service Manager to facilitate building report templates. See Creating Reports and Report Templates for more information about using the Microsoft SSRS report builder.
About Using Microsoft Business Intelligence Development Studio
This information explains how to create reports with Service Manager Cloud platform and how to use Microsoft Business Intelligence Development Studio (BIDS) to create reports directly from your desktop. You can access the BIDS documentation at https://msdn.microsoft.com/en-us/library/ms173767(v=sql.105).aspx.
BIDS is the former integrated development environment (IDE) from Microsoft, which was used to develop data analysis and business intelligence solutions utilizing the Microsoft SQL Server Analysis Services, Reporting Services, and Integration Services.
BIDS is based on the Microsoft Visual Studio development environment, but customized with Microsoft SQL Server services-specific extensions and project types, including tools, controls and projects for reports, data flows, and data mining structure.
Report Managers and administrators can create their own customized report templates and then create reports from these custom report templates.
Service Manager provides default reports as a reporting solution that you can customize. If you have already customized some of your reports, you can download those reports from your own instance and update them in the solution.
Getting Started with BIDS
If you have trouble downloading BIDS, see Allowing Internet Explorer 9 to Automatically Prompt for Downloads in the Troubleshooting Reports topic.
1.Start BIDS by doing the following:
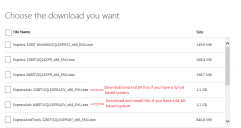
| a. | Download and install BIDS from the Microsoft download center at http://www.microsoft.com/en-us/download/details.aspx?id=30438. |
| b. | Install the file called SQLEXPRADV_x64_ENU.exe. |
| c. | Depending on the type of system that you are using, download and install the correct file. |
Selecting the Download Package
2.Copy the file called SSRSReportExtension.dll into Program Files\Microsoft Visual Studio 9.0\Common7\IDE\PrivateAssemblies by following these steps:
| a. | Log into the Service Desk Console. |
| b. | Open the Knowledge workspace. |
| c. | Enter 16931 in the Search box to access the article "Using Business Intelligence Design Studio (BIDS) with Ivanti Service Manager." |
| d. | Copy the SSRSReportExtension.dll file from the HEAT Reporting BIDS.zip file. |
If you have two different program files for a 32-bit and a 64-bit system, copy the SSRSReportExtension.dll file into both of the folders. You must place the SSRSReportExtension.dll file in the Private Assembly folder of the BIDS installation.
3.To open BIDS, do the following:
| a. | Go to Heat Reporting - BIDS and access the HeatReports folder. |
| b. | Open HeatReports.sln. |
4.In the Solution Explorer pane, double-click HeatReports > Shared Data Sources > SaaSAppModel.rds.
SaaSAppModel.rds
5.In the Shared Data Source Properties dialog box, click Edit located near the Connection String button and enter the credentials that your Service Manager administrator provided.
6.Click Test Connection to verify your connection.
7.Check Save my password.
8.Click OK in the next two screens.
Creating a New Report with BIDS
Follow these steps to create a new report using the BIDS New Report.rdl [Design] template:
1.Double click New Report.rdl in the Solution Explorer. The system displays the NewReport.rdl [Design] template.
NewReport.rdl [Design] Template
2.Expand Data Source on the left side. (If you do not see the Report Data panel on the left side of the screen, select View > Report Data to display the panel.)
3. Right-click SaaSAppModel.
4. Select Add Dataset. The system displays the Dataset Properties dialog box.
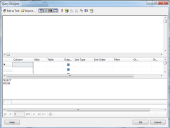
5.Click Query Designer.... The system displays the Query Designer dialog box.
Query Designer
6.Use the Query Designer dialog box to create the Microsoft SQL query for this dataset.
| a. | Click Edit as Text to create the Microsoft SQL query. |
| b. | Enter a query. |
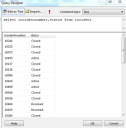
| c. | Click ! to verify the data. |
| d. | Click OK to run the query. |
| e. | Enter a meaningful name for the dataset and click OK to save the dataset. |
Verify Data
The system displays the dataset under Datasets in the Report Data left pane.
Dataset
7.Create a report using your new dataset and save the report using a new name.
8.Upload the BIDS report template to Service Manager by following the procedure described in Downloading and Uploading a Report Template. The system uploads the report created in BIDS as a report template to Service Manager.
BIDS refers to a report while Service Manager refers to a report as a report template.
Editing an Existing Report with BIDS
If you make any changes to the report template parameters, you must recreate the corresponding reports.
To edit an existing report follow these steps:
1.Double click the report name from the Solution Explorer.
2.Edit the report by following the steps in Creating a New Report with BIDS.
3.If you upload a report template with the same name, the system asks if you want to update the existing report. If you select Yes, the system updates the existing report template in Service Manager.
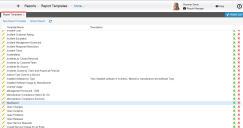
4.To edit a customized or new report, access Service Manager and click Download. The system displays the Report Templates workspace.
Report Templates Workspace
5.From the Solution Explorer, right-click Reports > Add > Existing Item.
6.Edit the report according to your business requirements.
Existing Report
7.Upload the report as a report template in Service Manager. If you upload the report using the same name, the system overwrites the existing report template.
About the SSRSReportExtension.dll File
As part of the reports module, Service Manager provides a custom Microsoft .NET DLL file called SSRSReportExtension.dll. This file calculates the duration for the Service Manager reports. In reports with DateTime values, you can filter the data based on a specified number of days, weeks, months, quarters, or years.
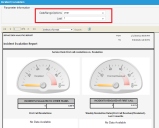
Example Report with DateTime Value
The SSRSReportExtension.dll file uses three methods called getStartDateTime, GetEndDateTime, and GetValidationListSQL. These methods run inside the Microsoft SSRS server and calculate the DateTime logic for the reports. The system passes the report parameters to those methods and the methods calculate the dates required for the reports.
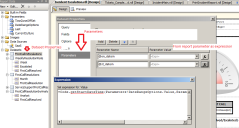
In the Dataset Properties dialog box, under the Parameters heading, you can define parameters and their values. You can use expressions for the parameter values. For example, you could create a parameter called @en_datein and set its value to =Code.getStartDateTime(Parameters!DateRangeOptions.Value, Parameters!TimeZoneOffset.Value, Parameters!Last.Value) . Use the query designer to declare and then call the parameter inside the query.
Using the SSRSReportExtension.dll File
Was this article useful?
The topic was:
Inaccurate
Incomplete
Not what I expected
Other
Copyright © 2018, Ivanti. All rights reserved.
